Nombre de messages : 25 Date d'inscription : 30/01/2008
Sujet: 10/22 TIPS & TRICKS Ven 1 Fév 2008 - 18:06
Ils y a quels que annees deja que j'avais prit le temps d'ecrire des "tips & tricks" pour la 10/22 sur Cannadiangunnutz.
Je vais maintenant les partagés avec vous monsieurs.
Je suis desoler si c'est en anglais, pour ceux qui ne comprend pas il ya toujours "google translator" qui pourrai vous aider. Ou vous pouvez toujours m'envoyer un MP.
Enjoy!
Dernière édition par le Ven 1 Fév 2008 - 20:55, édité 1 fois
Goose25 Nouveau / Newbie
Nombre de messages : 25 Date d'inscription : 30/01/2008
If you are having the problem of the cartridges not moving up in the Butler Creek Steel Lips magazine's. Here is the quick fix.
This is usually caused by the rims catching on a small area near the rear of the metal cartridge guide.You can fix it by using a small, flat jeweler's file and removing a very small amount of the ramped area marked in red. (See photo)
Goose25 Nouveau / Newbie
Nombre de messages : 25 Date d'inscription : 30/01/2008
Here is a step-by-step diagram of the 10/22 trigger disassembly/assembly.
STEP ONE: Remove hammer strut (#22), hammer spring (#23) and hammer strut washer (#24) . Hammer (#19) should be in the fired position (fired position= forward)
STEP TWO: Push out hammer pivot pin (#21), remove hammer (#19), hammer washers (#20), and remove bolt lock spring (#20A)
STEP THREE: Push out ejector pin (not shown) and remove ejector (#2)
STEP FOUR: Push out magazine latch pivot pin (#7), remove bolt lock (#5), push on magazine latch plunger (#3) to release/remove magazine latch (#6), remove magazine latch plunger (#3) and magazine latch plunger spring (#4)
STEP FIVE: Push on trigger pivot pin (#16), remove trigger (#11) and disconnector (#12), disconnector pivot pin (#13), sear (#14), sear spring (#15), trigger plunger (#17) and trigger plunger spring (#1)
STEP SIX: If you do not ABSOLUTELY need to remove the safety, I advise to leave it in place. If you do decide to take it out put your trigger group inside a plastic bag while you do it, or you may be looking for the safety detent plunger (#9) and safety detent plunger spring (#10) on the floor. Rotate the safety (# 1/4 turn. Then use the bolt stop pin (not shown), to push the safety out.. The bolt stop pin will keep the plunger and spring in place. Pull out bolt stop pin, and retrieve Plunger (#9) and spring (#10). ( If the safety does not come out, try rotating the safety another 180° and see if that helps.)
***NOTE*** -Step one, It is not nessecary to remove hammer spring (#23) and washer (#24)from hammer strut(#22).
-Step five, to remove disconnector from trigger, push out disconnector pivot pin.
-Reassemble in reverse order
-When reassembling make sure Hammer Strut washer (#24) face's up.
Dernière édition par le Ven 1 Fév 2008 - 18:16, édité 1 fois
Goose25 Nouveau / Newbie
Nombre de messages : 25 Date d'inscription : 30/01/2008
To make your own auto bolt release simply use a small file or dremel and remove excess material so that your bolt release ends up looking like the one to the right.
***Note*** To ensure proper function of the auto bolt release, you do NOT want the top of your hole to be filed flat. Again, you want your auto bolt release to ressemble the one to the right.
Dernière édition par le Ven 1 Fév 2008 - 18:16, édité 1 fois
Goose25 Nouveau / Newbie
Nombre de messages : 25 Date d'inscription : 30/01/2008
The Ruger receiver is investment cast. As the Factory mold wears with continued use a "hump" develops in the mold on the top of the receiver just at the front edge where the scope mount attaches. This is not present in all receivers but you can easily check it on your receiver by holding a straight edge along the top and then holding it up to a lighted background to check for flatness. If present this will tilt your scope up, thus causing your barrel to shoot low, and necessitating raising the elevation of the scope to compensate.
There are several solutions for this problem:
(A) File the top of the reciever flat underneath the scope mount. If you never intend to use open sights this modification will never be seen.
(B) Use scope rings that can compensate for this misalignment (ie, burris signature rings with pos align insert kit.)
(C) shim the rings, (cut out a small piece of tin from a coke can).
Barrel Drop
Many... but not all 10/22's that have been free floated and have a heavy bull barrel mounted may suffer from barrel drop. The 10/22 wasn't designed for a free flotting barrel ...It depends on the stock to support the barrel and actually hold it up. Also, There is the way the barrel attachment system is designed that is of no help. When the replacement barrel is installed and if you can rock it back and forth in the receiver before tightening the vee block, its going to pull the heavy bull barrel down when tightened. If this has occured, chance's are you will have a barrel drop.
There are also a couple solutions for this problem:
(A) With the use of a self stick foam/rubber pad (1/8" thick) you can help support the barrel. simply cut out a 1"x1" square and stick it into the barrel channel about an inch from the end (not just ahead of the reciever, but near the tip of the stock).
(B) If you can rock the barrel back and forth in the receiver before tightening the vee block, you can tighten the fit by shimming it (Cut out a small piece of tin from a coke can).
Running Out Of Elevation Adjustments
Many shooter's have run out of "up elevation" adjustment on thier scope and the rifle is still shooting low. This is usually with high powered scope's. High powered scope's usually only have 15 MOA in one direction or the other. Some really big scopes, like over 24X power on the top end, will have only 20 MOA of adjustment, resulting in only 10'' of adjustments in any one direction. Low powered scopes below 12X usually have over 60 MOA , and you don't run into adjustment (windage or especially elevation) problems with them too often. High powered scope's just have a narrower range of adjustment than the lower powered scope's. Many shooter's will upgrade from a lower power scope that sighted in just fine, to a higher powered scope and run out of adjustment, never realizing that the reduced field of view of the higher powered scope is the problem. Combined with the above mentionned "ruger hump" and "barrel drop" serious misalignments can result.
Even if the misalignment were not severe and you could adjust to desired POI using the scope's internal adjustments (you will have used up a considerable range of the adjustment available). For example, suppose you have your scope sighted in for 50 yards and have used up almost all of the available adjustment range, then you desire to furthur raise the POI to 100 yards. For subsonic target .22lr ammo that is about 8" drop. there is a good chance you will run out of adjustment. Another point to consider in this situation is that when moving the adjustment to near max to get it sighted in, you are now looking through the edge of the lens. This is not the highest optical quality portion of the lens. The best quality view is as near to the center of the lens as possible.
In light of the above, it is desirable to initially center the crosshairs of the scope and then mount that scope to as near POI as possible and then use the crosshair internal adjustments to tweak the settings. This has two obvious advantages, (A) you are using the best portion of the lens, and (B) you have available a full range of adjustment in all directions.(Very longrange shooters may want to bias this setting in favor of more "up" elevation adjustment, but that is another story). New scopes come from the factory optically centered. You can easily center the crosshairs on your scope by turning each adjustment knob all the way to the stop, then reverse directions and count the evolutions to the opposite stop, then again reverse directions and count back half the full range. Don't press hard against either stop or you can damage your scope. Having your scope optically centering to your desired POI with the use of the burris signature rings with pos-align inserts, rather than using the internal settings on your scope, would seem like the best option. This ultimately leaving you with a full range of windage and elevation adjustments on your scope.
Goose25 Nouveau / Newbie
Nombre de messages : 25 Date d'inscription : 30/01/2008
The Factory Ruger 10/22 magazines (BX-1) can malfunctioning due to lack of cleaning, and have difficulty feeding rounds (the rotor isn't rotating). Disassembling, cleaning, and reassembling the Ruger 10/22 10-round rotary magazine is very simple, provided you have the right tools (you will need a 9/64" Allen wrench), some manual dexterity, and a few minutes of time.
Disasembly
Step 1: Pre-disassembly magazine. Ensure that the magazine is unloaded.
Step 2: Using hex wrench or pliers, loosen the round side with the hex-wrench socket -- to loosen, turn the screw head counterclockwise. Do not completely remove it yet. While doing so, push in on the screw head. You will notice the hexagonal piece on the opposite side of the magazine poking out. You may also notice the wall on the far side of the magazine popping out as well. For now, press the wall back into place so the hexagonal piece sticks out like so.
Step 3: Remove the hexagonal piece
. Step 4: Remove the screw.
Step 5: Remove magazine wall.
Step 6: Remove the rotor. Note that one vane on the rotor is longer than the others. Keep this in mind. There's generally no need to remove the spring from the rotor hub.
Step 7: Remove the metal feed lips. Note the angle it's at, which side is "up", and the different sized nubs on each end.
Step 8: Magazine is disassembled. Clean magazine thoroughly with a good solvent. I used Break-Free CLP, patches, and q-tips to remove fouling. Clean the vanes on the rotors, the feed lips, the removeable wall, and the main cylindrical body of the magazine. Be sure to wipe everything dry after cleaning.
Step 2: Replace metal feed lips. Insert rotor. Note there are two ends to the rotor -- one with a small "shelf" where the vanes end, and one with a long "shelf". The long side goes in first and should fit into a depression in the magazine. Turn rotor clockwise until long vane is inside feed lips.
Step 3: Insert screw into the hole at the bottom of the magazine. While this can be done before Step 2, I did it in this order. Doesn't really matter. This prevents the rotor from falling out of its little depression. Note alignment of rotor vanes with long vane inside feed lips.
Step 4: Examine the small hexagonal piece. Observe the small hole. Then examine the spring sticking out of the partially-assembled magazine. Note the small bit of spring that's vertical. Do nothing for now, just note their existence.
Step 5: Replace magazine wall. Ensure it fits properly on feed lips and that the spring protrudes from the hole in the center.
Step 6: Align the small hole on the hexagonal piece and the small vertical spring bit. They should fit together like so.
Step 7: Note that the hexagonal piece has six flat sides. Start with the spring untensioned, then rotate it four to six (usually six)notches clockwise. When properly tensioned, use your finger to press the hexagonal piece into the hexagonal depression in the magazine wall. Then, while holding the hexagonal piece in place, use your hex wrench to tighten the screw on the other side. Ensure it's tightened firmly, but do not strip the threads or screw head. (tighten screw [with 9/64" Allen], back-off by 1/8 of a turn, so as not to bind the rotor.)
Step 8: Magazine is reassembled. Verify spring tension and proper functioning by loading and unloading rounds. Ensure that each round springs smartly into position. Some magazines may require additional tensioning (perhaps to eight or nine notches, rather than four or six). If so, partially disassemble, adjust, and reassemble as described above.
***Note***
Unfortunately, all of the aftermarket magazines I'm familiar with are permanently assembled and can not be taken apart for cleaning. About the best you can do for these is to brush off the feed lips and follower with a toothbrush and some evaporating solvent, like electrical contact cleaner. Leave the magazines upside down to drain and dry after doing this, and don't put any oil into them because the oil will trap dirt in the mags.
Dernière édition par le Ven 1 Fév 2008 - 18:17, édité 1 fois
Goose25 Nouveau / Newbie
Nombre de messages : 25 Date d'inscription : 30/01/2008
WARNING: This should only be attempted by someone with an in depth knowladge of the Ruger 10/22 and 10/22 Magnum rifles.
Time from start to finish is about 24 hours but only about 10 to 15 minutes of actual work. The modifications below are not designed to reduce the trigger pull weight, they are only to help get rid of take up (creep) in the trigger group.
Step1: You will need: The trigger, sear, trigger pin, disconnector, disconnector pin and the disconnector spring. Once you have the parts gathered clean them with rubbing alcohol to insure the paste wax will stay in place.
Step2: Rough up the surface of the sear with 80 or 100 grit paper so the JB weld will stick better.
Step3: Once the sear is prepped gather the sear, trigger and diconnector.
Step4: Apply a thin coat of paste type auto wax to the inside of the trigger, and on sear and disconnector making sure not to get any wax on the surface of the sear where the JB Weld is to be applied. I often use a toothpick to apply the wax as it allows me to be able to get into the trigger itself much easier.
Step5: Install the sear into the trigger with the trigger pivot pin. I use all the pins that I would use in the trigger guard itself as that will help cut down on tolerance stacking and extra play in the finished product.
Step6: Cover the sear/disconnector spring with more wax and install in place. Once that is done apply a small amount of well-mixed JB Weld, about the size of a split pea, to the sear. It is hard to say just how much it will take to do this because no two are alike.
Step7: With the JB Weld in place pivot the sear so that the end with the JB Weld on it is at the bottom of the trigger and install the disconnector and disconnector pivot pin. Once that is done engage the disconnector until you hear it click and reset. At this point you will want to stand the trigger up so that the JB Weld does not run down into the spring. Make sure it is in a place where it will not be disturbed and let cure for 12 to 14 hours.
Step8: After 12 to 14 hours have passed drift out the pins and rotate the whole sear/disconnector assembly out of the trigger. This is why you need to use the paste wax as a mold release.
Here is a close up so you can see what the sear and disconnector assembly should look like when removed from the trigger.
Step9: Remove the disconnector and spring from the sear, this is what it should look like at this point.
Note: If the JB Weld didn't flow evenly and you see air voids at the edge where the disconnector normally touches the sear you can start over from here. Simply take a razor blade and slip it under the JB Weld and it will come off easily.
Step10: Carefully trim off the extra JB Weld from both sides of the sear.
Step11: This is the critical area were great care must be taken as the JB Weld is still somewhat soft and can be damaged easily.
Carefully trim off the last of the extra JB Weld, cut it as close to parallel to the back edge of the sear as possible. Remember, if you mess up here you can just cut off the JB Weld with a razor blade and start over.
This is what it should look like at this point. Now let the JB Weld cure another 12 to 24 hours before going on with the next step.
Step12: Now that the JB Weld has cured a full 24 hours or more you will need to sand it down PARALLEL to the surface of the sear where it was applied. Using 200 grit paper slowly and carefully sand the JB Weld down parallel to the sear until there is just about 1/16th of an inch, of slightly less, at an angle to the sear. Note: You sand only the large flat serface of the JB Weld, not the angled part from the tip of the arrow to the end of the sear (in photo below)
After carefully sanding the JB Weld this is what it should look like. Now you are done, reinstall all the parts into your trigger guard and see how it feels. There should be very little to no take up before you feel the sear starting to move across the face of the notch in the hammer.
Good luck!!!
-------------------------------------------------------------------------- Special thanks to Joe W.
Goose25 Nouveau / Newbie
Nombre de messages : 25 Date d'inscription : 30/01/2008
WARNING: This should only be attempted by someone with an in depth knowledge of the Ruger 10/22 and 10/22 Magnum rifles.
The modifications listed below are not designed to reduce the trigger pull weight, only to smooth out the action during cycling.
Step1: Here are the assembled parts. One set has been worked over and polished and the other hasn't been touched.
Step2: The face of the hammer that rides against the bottom of the bolt before and after polishing. By removing the machine marks it cycles smoother, with the other polishing as well my trigger groups will run on some of the slowest sub sonic ammunition on the market.
Step3: The pivot end of the hammer that rides on top of the sear, before and after polishing.
Step4: The top of the disconnector before and after polishing. As the hammer rides on this as the bolt travels rearward I polish it as well.
Step5: The top of the sear that the hammer rotates against as the gun cycles, before and after polishing.
Step6: Bottom side of the sear. I only need to polish the very end of it where the disconnector contacts the sear but it is easier just to polish the whole flat area. This is done to allow for a smoother resetting of the disconnector.
Step7: The end of the sear before and after polishing. I do this to allow the disconnector to reset smoother and help cut down on the chances that the disconnector will not reset if the trigger rebound spring is too light.
Step8: Finally the trigger plunger is re-radiused and polished for a much smoother trigger pull.
Good luck!!!
-------------------------------------------------------------------------- Special thanks to Joe W.
Goose25 Nouveau / Newbie
Nombre de messages : 25 Date d'inscription : 30/01/2008
Must have a drill of some kind. I used a small hand-held electric drill.
Supplies (Brownell’s): 1. 8-40 Taper Tap (#395-840-001)=$1.82
2. 28gauge wire jobber-length drill bit (#891-128-140)=$2.45
3. *Pack of 8-40x1/4" torx screws (#080-924-484)=$5.22. That’s enough screws for at least 2, receivers.
4. 1/4" drill bit (#891-201-400)=$3.23 (if you already have one that's close to this size you can use it...its for countersinking the screw heads into your base).
Optional: 5. T-handle for taps (I used a pair of vicegrips instead) (#395-311-001)=$3.67
6. 16ga jobber length drill bit for opening the receiver holes to allow the bigger screws to clear (#891-116-177)=$3.21
Process: 1. Remove receiver from stock.
2. Remove barrel and all internals from receiver.
3. (Assuming the base is already on the receiver) remove only the two middle screws, leaving the base attached by just the two end screws.
4. Starting on the base side, use the 28ga bit to drill out the two vacant holes.
5. Tap the two holes all the way through the base and receiver.
6. Insert new screws into the newly tapped holes and tighten to ‘snug’.
7. Remove the other two original screws (leaving the new ones in place).
8. Repeat steps 4 & 5.
9. Remove the base from the receiver.
10. Now you need to open the holes in the base to allow the screws to spin freely. I simply put a screw in the holes (in the base only) and just stripped them out. You can use the 16ga bit if you’d prefer. Result is the same.
11. Replace base onto receiver with all 4 screws to make sure everything fits.
12. **With the ¼” bit and some trial and error, countersink the holes in the base so that the screw heads don’t stick up too far, and so that the screw ends just barely protrude down into the receiver (too far and they’ll bind on the bolt, not far enough and they won’t hold anything).
13. Remove everything again and thoroughly clean the receiver inside and out. Reassemble. Apply your favorite lube. Shoot.
Now you can actually tighten the base to the receiver with little worry of stripping. Ruger should have used 8-40 screws to begin with!
*This is for the standard Weaver T-09 base. If you have a Power Custom, or some other brand of base, your screw length (and corresponding Brownell’s number) may differ.
**A standard drill bit will not exactly match the angle on the Weaver screws, but its close enough considering that your using a steel screw to mate 2 aluminum pieces. If you can find a bit that exactly matches the angle, go for it. Also, the ¼” is just an approximate size, the one I used was actually 15/64” because that’s what I happened to have on hand.
Dernière édition par le Ven 1 Fév 2008 - 18:19, édité 1 fois
Goose25 Nouveau / Newbie
Nombre de messages : 25 Date d'inscription : 30/01/2008
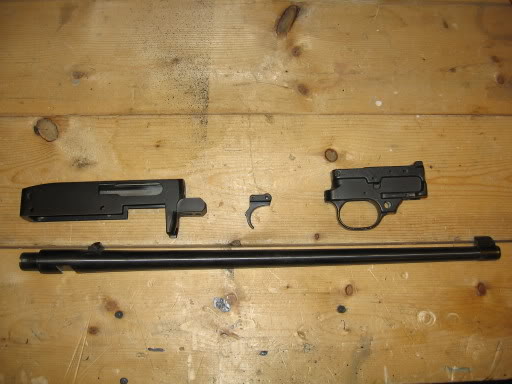
Converting a “blued” action 10/22 to “Stainless Steel”
Firstly, let me mention that the receiver on your 10/22 is not stainless steel but rather aluminum. In the past Ruger anodized their receivers, Nowadays they powder coat their aluminum receivers to obtain the “blued” look. If you have a blued receiver and would like to have it looking like a SS then it’s just a question of removing the powder coat/anodizing.
All newer 10/22’s have a polyester based powder coat, (not the higher grade epoxy based powder coat. If it was epoxy, you could not strip it.) If it is powder coated then you must use an ALUMINUM SAFE paint stripper. (aka Aircraft Stripper, BIX Tuff Job stripper, Chem-dip, ect.) . Remember… The one thing you really have to be careful of is the stripper. If it does not state on the can safe for all aluminum surfaces, it is not! I have seen badly pitted receivers from using the wrong stripper.
STRIPPING PROCESS
Step1: Apply stripper and let sit 10-15 minutes. It may take a couple of applications and you will most likely have to do a little scrubbing with a fine steel wool/scotch brite pad.
Step2: Wash with dish soap, hot water, and a stiff nylon brush (old toothbush)
Step3: Polish to a shine with aluminum polish (I like to use Mother’s aluminum wheel polish)
***NOTE*** If you have an older model 10/22 then chance’s are your aluminum receiver has been anodized to achieve the “blued” look (I don't know the years when they were anodized but I know I have a pre-safety warning 1973 DSP that has the anodized receiver.) If it is anodized then you can use oven cleaner. And it will strip off the anodizing... but realize that it may also etch the aluminum. Which will require sanding/polishing to remove the etching.
Parts to be stripped (excusing barrel):
This is what you will need:
Here are some before and after pictures:
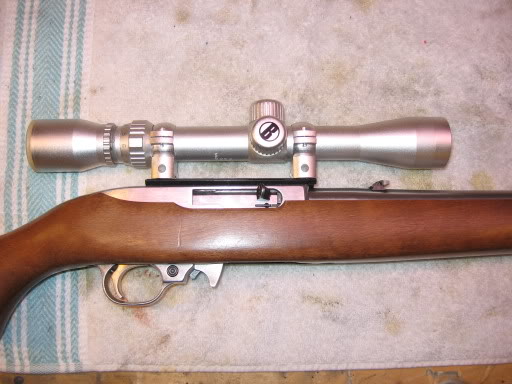
And VOILA...Final product:
Picanox Grande gueule / Big mouth
Nombre de messages : 4931 Age : 58 Localisation : Centre-du-Québec Emploi : Préretraité Loisirs : Tirer au club... Date d'inscription : 02/04/2011
Sujet: Re: 10/22 TIPS & TRICKS Mer 25 Mai 2011 - 21:30
Goose25 a écrit:
Modif du bouton de "release" de culasse. Je viens de faire cette modif sur ma 10/22 et j'ai même pas de Dremel...
C'est super facile, j'ai fait ça juste avec une petite lime demi-ronde, ça ma pris 15 minutes, la job au complet, ça vaut la peine, ça va super bien après...
Je disais des gros mots au club à cause de ce tab******e de bouton, fini de "zigonner" comme ont dit...
Merci Goose25 pour les infos.
erky Actif / Active
Nombre de messages : 362 Age : 45 Localisation : saint-basile-le-grand Emploi : Demers ambulances Loisirs : tir,chasse,pêche et camping Date d'inscription : 20/01/2010
J'ai fait une petite job de polissage de pièces de détente à ma Ruger 10/22, c'est vraiment pas compliqué et ça l'améliore pour pas cher...
Regardez ce petit vidéo pour voir comment faire.
Je met un plan des pièces du bloc détente, c'est toujours pratique pour le remontage.
Pop Grande gueule / Big mouth
Nombre de messages : 535 Age : 45 Localisation : zone2 a 5min de la zone1 Emploi : Technicien automobile Loisirs : Famille, Chasse et Pêche Date d'inscription : 29/05/2012
Sujet: Re: 10/22 TIPS & TRICKS Dim 9 Mar 2014 - 23:28
J'ai réussi a mettre ma détente a 3lbs après avoir visionné plusieurs vidéo sur YouPorn oups YouTube passé droit a 1 1/2 et revenu a 3lbs ce que je trouve très acceptable. C'est juste une question de course et d'angle. Important de vérifier le safe un coup la job de trigger fait car en enlevant le safe après avoir testé le marteau partait tout seul. Tout est bien expliqué dans le vidéo !
sebastien41 Grande gueule / Big mouth
Nombre de messages : 967 Age : 52 Localisation : monteregie Emploi : charpentier-menuisier Loisirs : papa travail gamer Date d'inscription : 06/05/2014
Modif du bouton de "release" de culasse. Je viens de faire cette modif sur ma 10/22 et j'ai même pas de Dremel...
C'est super facile, j'ai fait ça juste avec une petite lime demi-ronde, ça ma pris 15 minutes, la job au complet, ça vaut la peine, ça va super bien après...
Je disais des gros mots au club à cause de ce tab******e de bouton, fini de "zigonner" comme ont dit...
Merci Goose25 pour les infos.
je suis pas sur de comprendre cette manip. du moins le resultat ces auto du genre full auto ou une amelioration du semi-auto
Pop Grande gueule / Big mouth
Nombre de messages : 535 Age : 45 Localisation : zone2 a 5min de la zone1 Emploi : Technicien automobile Loisirs : Famille, Chasse et Pêche Date d'inscription : 29/05/2012
c'est genre que tu gosse pas avec le bouton pour reclancher le bolt, tu tire sur le bolt et il se désengage tout seul. c'est vraiment merveilleux !!!!
sebastien41 Grande gueule / Big mouth
Nombre de messages : 967 Age : 52 Localisation : monteregie Emploi : charpentier-menuisier Loisirs : papa travail gamer Date d'inscription : 06/05/2014


 ou une amelioration du semi-auto